Why Proper Furnace Vent Installation Can Save Your Life
Furnace vent installation is the process of safely routing combustion gases — including carbon monoxide — from your furnace to the outside of your home.
Here’s a quick overview of what it involves:
- Choose the right venting type – natural draft, power vent, or direct vent, based on your furnace’s efficiency rating
- Select the correct pipe material – PVC or ABS for high-efficiency furnaces (90%+), metal B-vent for standard-efficiency units
- Plan your pipe route – size pipes to your furnace’s BTU output, slope them 1/4 inch per foot back toward the furnace
- Follow clearance rules – keep terminations at least 12 inches above ground and 1 foot from windows and doors
- Seal and support every joint – use approved primer and cement, support pipes every 4 feet
- Meet local codes – follow ANSI Z223.1 (National Fuel Gas Code) and any state-specific rules like Massachusetts 248 CMR
Get any of these steps wrong, and you’re not just looking at an inefficient furnace. You’re risking carbon monoxide poisoning — an odorless, colorless gas that can be fatal.
A blocked or improperly installed vent can cause flue gases to back up into your living space. Most homeowners never know it’s happening until it’s too late.
Whether you’re replacing an old system or venting a new high-efficiency furnace, the stakes are high. This guide walks you through everything you need to know.
I’m Richard Marcello, President of Advanced Heating & Cooling, with over 30 years of hands-on HVAC experience that includes hundreds of furnace vent installation projects across Rhode Island and nearby Massachusetts. I’ll walk you through exactly what proper venting looks like — so you can make smart, safe decisions for your home.
 versus high-efficiency condensing furnace venting (PVC or ABS plastic pipes, two-pipe system with separate intake and exhaust, horizontal sidewall termination, 90%+ AFUE, with condensate drain), showing pipe materials, draft mechanisms, and key safety differences side by side - furnace vent installation infographic 2_facts_emoji_light-gradient")
Furnace vent installation word list:
- Smithfield HVAC installation services
- Smithfield furnace replacement company
- furnace replacement cost estimate
Understanding Furnace Venting Systems and Materials
When we talk about furnace vent installation, the first thing we have to look at is the type of furnace you have. Not all vents are created equal. If you try to vent a high-efficiency furnace using the same metal pipe as an old 70% AFUE unit, you’re going to have a literal mess on your hands—and potentially a dangerous one.
The Three Main Venting Categories
Furnaces are categorized by how they handle exhaust and efficiency. In our area, including Smithfield and North Smithfield, we see a mix of older homes with natural draft systems and modern homes with high-efficiency condensing units.
| Vent System Type | Efficiency (AFUE) | Pipe Material | Draft Mechanism |
|---|---|---|---|
| Natural Draft | ~70% | Metal B-Vent | Natural buoyancy (heat rises) |
| Power Vent | ~80% | Metal or Plastic | Mechanical fan pushes exhaust |
| Direct Vent | 90% – 98.5% | PVC, CPVC, or ABS | Sealed combustion (intake & exhaust) |
Category IV Furnaces and Plastic Venting
High-efficiency condensing furnaces (Category IV) are at least 90% efficient. Because they extract so much heat from the combustion process, the exhaust gases are actually quite cool—often cool enough to touch the pipe. However, this cooling causes the water vapor in the exhaust to condense into liquid.
This liquid isn’t just water; it’s acidic (carbonic acid). This is why high-efficiency furnaces must use PVC Schedule 40 or ABS-DWV pipes. Metal pipes would corrode and fail within months. In fact, Flickr CC Image by Bonnie Bogle shows how moisture and environment impact mechanical systems.
Single-Pipe vs. Two-Pipe Systems
In a single-pipe system, the furnace draws combustion air from the room it’s sitting in (like a basement or utility closet). In a two-pipe system (sealed combustion), one pipe brings fresh air in from the outside while the other sends exhaust out. We almost always recommend a two-pipe system. It’s safer, prevents backdrafting, and doesn’t “steal” the heated air from your home to burn it.
Step-by-Step Guide to Furnace Vent Installation
Installing a vent isn’t just about sticking a pipe through a wall. It requires precision. If the pipe isn’t pitched correctly, the acidic condensate will pool in the pipe, eventually causing the furnace to shut down or, worse, leaking into your home.
Planning and Sizing for Furnace Vent Installation
Before you cut a single hole, you need to calculate the “equivalent length” of your vent run. Every elbow you add—whether it’s a 90-degree or 45-degree turn—creates friction and acts like extra feet of straight pipe.
- BTU Capacity: A 60,000 BTU furnace might only need a 2-inch pipe, while a 100,000 BTU unit often requires 3-inch piping.
- Elbow Deductions: Generally, a 90-degree elbow counts as 5 to 8 feet of “equivalent length.” If your manufacturer says the max run is 60 feet and you have four elbows, your actual allowable straight pipe is much shorter.
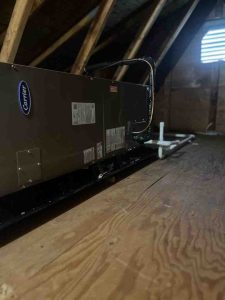
- Manufacturer Specs: Always check the manual. Some brands, like Carrier, have specific requirements for the first 18 inches of straight pipe before the first turn.
If you’re unsure about the sizing for your specific home layout, check out our heating installation services or read more about expert furnace setup in Smithfield.
Executing the Furnace Vent Installation Process
- Dry-Fitting: Never glue until you’ve assembled the entire run. This allows you to verify the pitch and clearances.
- Deburring: After cutting PVC, use a tool or sandpaper to smooth the edges. Burrs can catch debris and cause blockages.
- Primer and Cement: Use purple primer (to show inspectors you used it) and PVC cement. This creates a molecular bond. Once it’s set, it’s permanent.
- Hanger Straps: Support the pipe every 4 feet. PVC is flexible; if it sags, water will pool in the low spots.
- Wall Penetration: For side-wall kits like the BAYVENT200B, you’ll typically need a 3-7/8 inch hole.
- Sealing: Use RTV silicone to seal the gap between the pipe and the exterior wall to keep out pests and moisture.
Critical Clearances and Compliance Standards
Clearances are the “rules of the road” for furnace vent installation. They are designed to prevent exhaust from re-entering your home through a window or door and to keep the vent from being buried by snow.
National and Local Codes
All installations must comply with the National Fuel Gas Code (ANSI Z223.1). However, living in Rhode Island or Massachusetts means we have specific regional requirements:
- Massachusetts 248 CMR: If you are in North Smithfield or crossing the border into MA, you must follow strict rules for side-wall venting. This includes installing a carbon monoxide detector on every floor where there is a bedroom and placing specific signage on the outside of the building if the vent is less than 7 feet above grade.
- Snow Clearance: In our New England winters, the vent must terminate at least 12 inches above the highest expected snow line. If your vent is too low, snow will block it, and your furnace will quit right when you need it most.
- Window and Door Offsets: Generally, a vent must be at least 1 foot away from any door, window, or gravity air inlet. If you’re using a single-pipe system, that clearance often increases to 4 feet.
For those interested in technical specifics, the DOE standards for roof vent installation provide excellent checklists for vertical terminations.
Safety Protocols and Maintenance for Venting Systems
A furnace vent is a “set it and forget it” component—until it isn’t. Maintenance is vital because small blockages can lead to big problems.
Annual Vent Inspection Tasks
We recommend checking your vents every autumn before the first big freeze. Here’s what we look for during regular heating maintenance:
- Pest Screens: Check for bird nests or beehives. While 1/2-inch mesh is great for keeping out squirrels, it can sometimes frost over in extreme cold.
- Condensate Freeze-up: Ensure the pipe is insulated if it passes through an unconditioned space like a crawlspace or attic.
- Backdrafting Test: We use smoke pens to ensure the furnace is properly drafting and not pulling gases back into the home.
- CO Detectors: Ensure they are installed and have fresh batteries. This is your last line of defense.
Common Mistakes in Furnace Vent Installation
We’ve seen it all in the Smithfield area. Some of the most common errors include:
- Improper Pitch: Sloping the pipe away from the furnace. This creates “ice sculptures” outside and blocks the vent.
- Sagging Pipes: Using too few hangers, leading to water traps.
- Incorrect Materials: Using cellular core PVC (which isn’t rated for pressure/heat in some jurisdictions) or old metal vents for high-efficiency units.
- Recirculation: Placing the intake too close to the exhaust, causing the furnace to “inhale” its own carbon dioxide, which leads to poor combustion and soot buildup.
Professional vs. DIY Furnace Vent Installation
Can you DIY a furnace vent installation? Some homeowners do, but it’s risky.
- Warranty: Many manufacturers, like Carrier, require professional installation to keep the 10-year parts warranty valid.
- Tools: Do you have a core drill for concrete walls or a manometer to check gas pressure and draft?
- Safety: An error in venting is a life-safety issue.
- Costs: While a DIY job might cost $100 in materials, a professional installation ensures it meets code and passes inspection, saving you from costly red-tags later.
If you’re weighing your options, take a look at our guide on finding top furnace replacement services.
Frequently Asked Questions about Furnace Venting
Can I vent a high-efficiency furnace through a chimney?
Generally, no—at least not directly. You cannot dump the raw exhaust into a masonry chimney because the acidic condensate will destroy the mortar. However, you can run a PVC liner through an existing chimney to use it as a “chase” to reach the roof.
Why does my furnace vent need to be made of plastic instead of metal?
High-efficiency furnaces produce “condensate”—a watery, acidic byproduct. Metal pipes (even galvanized ones) will rust and develop holes when exposed to this acid. PVC and ABS are plastic and are completely immune to this type of corrosion.
How far should the exhaust pipe be from the intake pipe?
If you aren’t using a concentric vent kit (which combines both into one), the exhaust should typically terminate at least 12 inches away from—and 12 inches higher than—the air intake. This prevents the furnace from sucking in its own exhaust.
Conclusion
Proper furnace vent installation is the backbone of a safe and efficient home heating system. From choosing the right Schedule 40 PVC to ensuring the perfect 1/4-inch pitch, every detail matters. Whether you live in Greenville, Johnston, or right here in Smithfield, don’t leave your family’s safety to chance.
At Advanced Heating & Cooling, we bring over 30 years of experience to every job. We know the local Rhode Island and Massachusetts codes inside and out, and we’re committed to quality workmanship that keeps your home warm and your air safe.
Ready to ensure your system is vented right? Schedule your professional heating installation or repair today with the experts at Advanced Heating & Cooling. We offer free estimates and honest advice for all your HVAC needs.